varilator 仿真简介和示例
varilator被称为是第四大仿真器,而且开源,chisel开源项目的仿真基本上是基于varilator,follow了无数次git clone和make之后,也想打开这个黑盒看看。正巧钦哥趟了一遍这坑,还写了挺详细的文档,顺便分享一波。
1、模块准备
首先,假设我们写好一个模块,如Accumulator.v:
module Accumulator(
  input  [7:0] io_din_0,
  input  [7:0] io_din_1,
  input  [7:0] io_din_2,
  input  [7:0] io_din_3,
  output [9:0] io_dout
);
  wire [8:0] _io_dout_T = io_din_0 + io_din_1;
  wire [8:0] _io_dout_T_1 = io_din_2 + io_din_3;
  assign io_dout = _io_dout_T + _io_dout_T_1;
endmodule
若要验证功能,modelsim或vcs的套路便是写一个tb_Accumulator.v,但varilator与其不同,需要写一个main.c,里面包含了激励测试。
Verilator 不会简单地将 Verilog HDL 转换为 C++ 或 SystemC。Verilator 不仅可以翻译,还可以将代码编译为速度更快的优化与可选的线程分区模型,同时这些模型封装在C++/SystemC/Python模块中。 经过编译的 Verilog 模型,即使在单线程上执行的速度也比独立 SystemC 快 10 倍以上,并且在单线程上的执行速度比诸如 Icarus Verilog 之类的解释 Verilog 模拟器快 100 倍。多线程可能还会使速度提高 2-10 倍(在解释型模拟器上总共可以提高 200-1000 倍)。
2、测试模块
main.c 如下:
#include "verilated_vcd_c.h" //可选,如果要导出vcd则需要加上
#include "VAccumulator.h"
vluint64_t main_time = 0; //initial 仿真时间
double sc_time_stamp()
{
return main_time;
}
int main(int argc, char **argv)
{
Verilated::commandArgs(argc, argv);
Verilated::traceEverOn(true); //导出vcd波形需要加此语句
VerilatedVcdC* tfp = new VerilatedVcdC; //导出vcd波形需要加此语句
VAccumulator *top = new VAccumulator("top"); //调用VAccumulator.h里面的IO struct
top->trace(tfp, 0);
tfp->open("wave.vcd"); //打开vcd
while (sc_time_stamp() < 20 && !Verilated::gotFinish()) { //控制仿真时间
top->io_din_0 = main_time + 0; //激励控制
top->io_din_1 = main_time + 1;
top->io_din_2 = main_time + 2;
top->io_din_3 = main_time + 3;
top->eval(); //计算输出
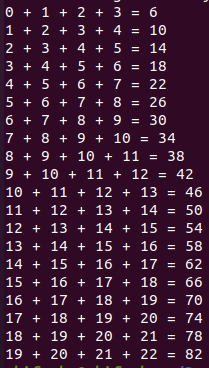
printf("%d + %d + %d + %d = %d\n",top->io_din_0,top->io_din_1,top->io_din_2,top->io_din_3,top->io_dout); //命令行输出仿真结果
tfp->dump(main_time); //dump wave
main_time++; //推动仿真时间
}
top->final();
tfp->close();
delete top;
return 0;
}
3、运行仿真
运行仿真分成三步:
a、生成目标文件夹
verilator -Wno-fatal Accumulator.v main.c --top-module Accumulator --cc --trace --exe
-
-Wno: 忽略非 fatal 的 warning -
Accumulator.v是设计文件 -
main.c是主程序 -
--top-module:顶层模块名,注意是模块名,不是文件名 -
--cc:表明是C++,不过 c 程序也是支持的 -
--trace表明会追踪波形,如果需要导出vcd 或者 fst 等其他波形文件,需要加上这个选项 -
--exe:生成可执行文件
运行完后会在当前目录生成obj_dir文件夹,这么多文件不需要深究。

b、编译
make -C obj_dir -f VAccumulator.mk VAccumulator
- VAccumulator.mk 也是生成出来的一个文件,在 obj_dir 文件夹里面,用于自动化的编译控制
- 最后一个参数是输出可执行文件的文件名,最好不要乱改,就"V" + "design_name"
c、运行和查看波形
./obj_dir/VAccumulator
gtkwave wave.vcd
最后再次感谢独守空寝仍日卷不殆的钦哥。
谢谢帆哥分享!!!新年快乐鸭~~
愿独守空寝的小甜甜早日回家[旺柴]
请问main.c文件中的top->和!Verilated::gotFinish()这些指令该去哪里学呀,刚入verilator感觉看不懂如何书写main.c文件也不知道从何下手。
先把它当成黑盒吧,我也不懂,只需要改后面的东西就行,真正有需要的时候再找吧
verilator官网有手册有解释
可以看看Verilator文件里的example目录下的示例工程,里面有详细的注释