CNN训练MNIST数据集tenflow2(上)
背景
还是那片nature的文章Fully hardware-implemented memristor convolutional neural network。忆阻器的精度很低,虽然外围的ADC是8bit,但忆阻器实际的精度有4bit就不错了。希望先用32bit浮点数训练网络,然后做量化,比较准确率的下降情况:
- 搭建网络
- 增加噪声
- 量化权重
- 量化数据流
测试的环境如下:
python 3.7.4, tensorflow 2.0.0
一、 搭建网络
1.数据集准备
import tensorflow as tf
import numpy as np

# 1.数据集准备
minst = tf.keras.datasets.mnist
img_rows,img_cols = 28,28
(x_train, y_train), (x_test, y_test) = minst.load_data()
# 卷积运算需要将原来的(6000,28,28)变成(6000,28,28,1) ,即增加通道的参数
x_train = x_train.reshape(x_train.shape[0],img_rows,img_cols,1)
x_test = x_test.reshape(x_test.shape[0],img_rows,img_cols,1)
# 需要将原来的0-255的整数转为32bit单精度浮点数,再归一化为[0,1]
x_train = x_train.astype('float32')
x_test = x_test.astype('float32')
x_train = x_train / 255
x_test = x_test / 255
# 标签为独热码的形式,方便交叉熵运算
y_train_onehot = tf.keras.utils.to_categorical(y_train)
y_test_onehot = tf.keras.utils.to_categorical(y_test)
2. 模型搭建
keras搭建模型很方便:
# 2. 模型搭建
model = tf.keras.Sequential()
# 注意这里padding的类型“valid”,表示不填充外围,输出shape为(26,26,8)。并且没有设置bias,因为忆阻器硬件里不好添加
model.add(tf.keras.layers.Conv2D(8, kernel_size=(3, 3),padding="valid", activation='relu',use_bias=False,input_shape=(28, 28, 1)))
# 同样注意这里的padding类型“sample”,表示除不尽须填充而不是舍去,输出shape为(9,9,8)
model.add(tf.keras.layers.MaxPooling2D(pool_size=(3, 3),padding="same"))
# 同理,注意padding,输出shape=(7,7,12)
model.add(tf.keras.layers.Conv2D(12, kernel_size=(3, 3),padding="valid", activation='relu',use_bias=False,))
# 同理,注意padding,输出shape=(4,4,12)
model.add(tf.keras.layers.MaxPooling2D(pool_size=(2, 2),padding="same"))
model.add(tf.keras.layers.Flatten())
model.add(tf.keras.layers.Dense(10, use_bias=False,activation='softmax'))
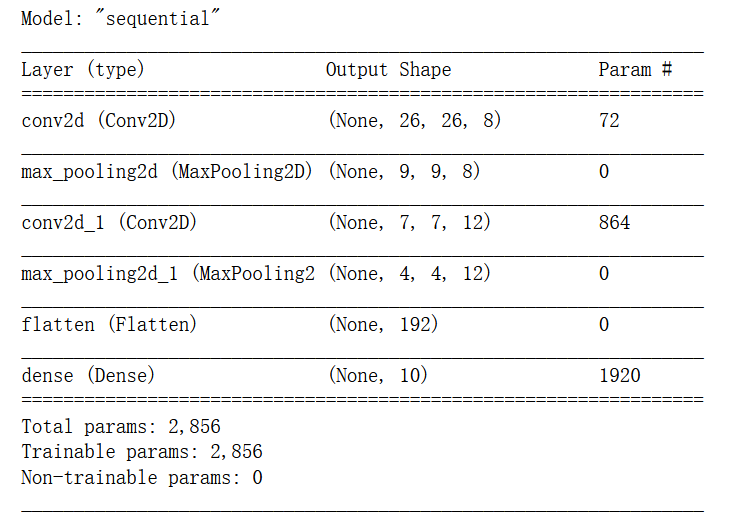
model.summary()
三、开始训练
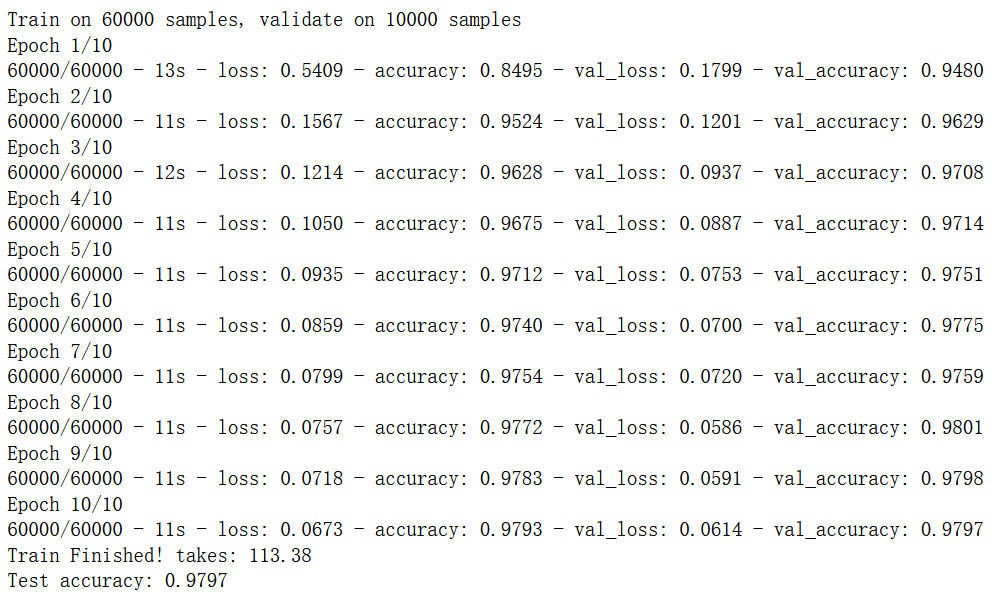
开始训练,数据集很小,cpu训练一两分钟左右就能达到98%准确率
model.compile(optimizer='adam', loss='categorical_crossentropy', metrics=['accuracy'])

from time import time
startTime = time()
history = model.fit(x_train, y_train_onehot, batch_size = 100, epochs = 10, verbose=2, validation_data = (x_test, y_test_onehot))
duration = time()-startTime
print("Train Finished! takes:","{:.2f}".format(duration))

score = model.evaluate(x_test, y_test_onehot, verbose=0)
print('Test accuracy:', score[1])
四、模型的保存和加载
如果还要后续操作,模型的保存和加载还是相当重要的。
# 1.保存框架,权重,优化器,损失函数
model.save('models/mnist_tf2_fw.h5')
# 2.保存框架,不含权重和配置
yaml_tring = model.to_yaml()
with open('./models/mnist_tf2_f.yaml','w') as model_file:
    model_file.write(yaml_tring)
# 3.保存权重,不含框架和配置
model.save_weights('models/mnist_tf2_w.h5')
保存量化后的tflite格式,找了好久才搞定的!tflite格式主要是为了安卓端推理应用推出的:
#1 未量化-32bit
converter = tf.lite.TFLiteConverter.from_keras_model(model)
tflite_model = converter.convert()
open("models/tflite_model_32.tflite","wb").write(tflite_model)

# 2.float16量化
converter = tf.lite.TFLiteConverter.from_keras_model(model)
converter.optimizations = [tf.lite.Optimize.DEFAULT]
converter.target_spec.supported_types = [tf.float16]
tflite_model = converter.convert()
open("models/tflite_model_16.tflite", "wb").write(tflite_model)

# 3.8bit量化
def representative_data_gen():
# *这里需要注意:函数需要获得x_train的shape信息
    data = tf.data.Dataset.from_tensor_slices(x_train).batch(1).take(100)
    for input_value in data:
        yield [input_value]

converter = tf.lite.TFLiteConverter.from_keras_model(model)
converter.optimizations = [tf.lite.Optimize.DEFAULT]
converter.representative_dataset = representative_data_gen
# Restricting supported target op specification to INT8
converter.target_spec.supported_ops = [tf.lite.OpsSet.TFLITE_BUILTINS_INT8]
# Set the input and output tensors to uint8
converter.inference_input_type = tf.uint8
converter.inference_output_type = tf.uint8
# Convert and Save the model
tflite_model = converter.convert()
open("models/tflite_model_8.tflite", "wb").write(tflite_model)

# 4.动态量化
converter = tf.lite.TFLiteConverter.from_keras_model(model)
converter.optimizations = [tf.lite.Optimize.DEFAULT]
tflite_model = converter.convert()
open("models/tflite_model_dy.tflite", "wb").write(tflite_model)
五、小结
截止目前,我们已经做好了训练,分别保存了32bit、16bit、8bit的量化模型。接下来的工作是加载模型,查看增加噪声、量化后对精度的损失。